

In this tutorial, we will install the 14-day trial for Tableau Desktop, walk through the User Interface, and build our first dashboard. This might sound like a lot of content, but we briefly introduce the components and concepts with more depth added in later tutorials.
Installing Tableau Desktop
Before we get started with the installation we must first look at the technical requirements and considerations:
- Windows
- Microsoft Windows 7 or newer (64-bit)
- Microsoft Server 2008 R2 or newer
- Intel Pentium 4 or AMD Opteron processor or newer
- 2 GB memory
- 1.5 GB minimum free disk space
- Mac
- iMac/MacBook computers 2009 or newer
- OSX 10.11 or newer
- 1.5 GB minimum free disk space
- Virtual Environments
- Citrix environments (non-streaming), Microsoft Hyper-V, Parallels, VMware, Microsoft Azure and Amazon EC2.
- All of Tableau’s products operate in virtualized environments when they are configured with the proper underlying Windows operating system and minimum hardware requirements.
- Internationalization
- These products are Unicode-enabled and compatible with data stored in any language. The user interface and supporting documentation are in English, French, German, Spanish, Brazilian Portuguese, Japanese, Korean and Simplified Chinese.
Read more at https://www.tableau.com/products/techspecs
If everything above sounds hunky-dory, let us get started with the installation:
- Go to https://www.tableau.com/products/desktop
- Click on the Try it for free.
- In the Download Tableau Desktop page, enter your email address and click Download Free Trial.
- This file is under 400mb.
- Once the file is downloaded, begin your installation:
- For Windows Installation: Double-click the file to kick off the installation, you will see several prompts to be filled.
- For Mac Installation: Mount the downloaded file, open the disk and double-click the installer package to kick off the installation.
- If all goes well, you should have installed Tableau Desktop, so let us open the application for the first time.
- Upon opening Tableau Desktop after a fresh install you will get shown an Activate Tableau window.
- Enter in your details and click Start Trial Now.
And boom you should be done, so let us walk through the Tableau Desktop User Interface.
Note: You can also get a trial for Tableau Server as well as Tableau Prep, but we will cover that in future tutorials.
Tableau Desktop
Note: I am using Tableau Desktop 2018.2.2 (20182.18.0925.2120) 64-bit
Now that you have downloaded and installed Tableau Desktop, activated the Trial, you should be able to use Tableau Desktop now; the first thing you will see is the Start Page. Let us walk through this:
- Menu – in the Start Page the menu is limited, generally speaking, this provides the same functionality as the menu bar in all application that you use. The ability to save, adjust your user interface, and more importantly, engage with the Tableau Server, we will cover this in future tutorials.
- Connect Menu – shows you all the data sources that you can connect to, we have:
- To File – allows you to connect to various files on your local machine, including JSON, Text, Spatial, Statistical files.
- To Server – allows you to connect to various, and I mean various, enterprise data sources from standard on-premise RDBMS to state of the art cloud data stores. There are 60 connectors at the moment and also the possibility to connect via ODBC and Web Data Connectors.
- Saved Data Sources – allows you to choose a saved data source; once you connect to a data source in Tableau and go through the process of entering connection details, you can save all this information for quick use.
- Open (front and centre) – will list out your recently accessed dashboards.
- Samples Workbooks – are packaged Tableau Sample dashboards that you can reference and learn from.
- Discover – will show you some news and latest information from Tableau.
Let us get started by opening one of our Saved Data Sources, click on World Indicators to get started. Now you are about to get deep into Tableau, so let us look around and explore the interface.
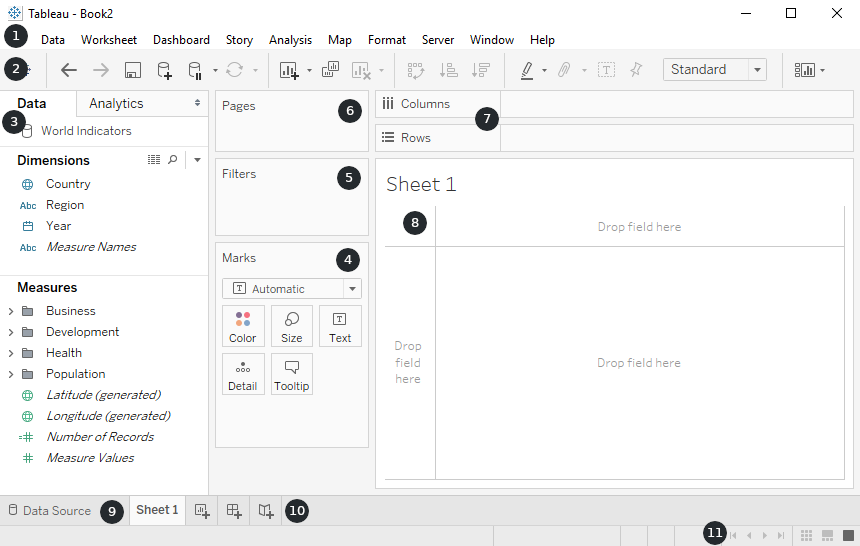
Let us take this apart:
- File Menu – allows you to navigate the Tableau Desktop application.
- Toolbar – is a quick way to access commands, data, analysis and navigation tools.
- Side Bar – consists of the Data Pane and Analytics Pane. The Data Pane represents the selectable items in your data source, the Analytics Pane allows you to perform self-service analytics on data within your View.
- Marks Card – Where you drag items to build the look and field of your view.
- Filters Shelf – Where you drag items to allow you to filter your view.
- Pages Shelf – This allows you to create pages of views where each page can represent a value in your data source. For example, you can have a view which shows the total sales for the months in a year, and each page can represent a year which you can navigate through.
- Columns and Rows Shelf – where you drag items to build your visualisation.
- View – WHere your data visualisation is rendered.
- Data Source – takes you to your Data Source Page where you can edit the data source for this visualisation.
- New Worksheet, Dashboard and Story – allows you to add more Worksheets, Dashboards and Stories to your workbook.
- Status Bar – show your values and other pieces of information around your actions; on the right, you have ways of searching through your worksheets, dashboards and stories which is useful when you start building large multi-worksheet dashboards.
Now let us create our first Tableau Worksheet.
Tableau Worksheets
Before we get too ahead of ourselves, we need to go through some basics Tableau terminology and file types, we will be quick, I promise:
- Tableau Worksheet – contains a single view along with shelves, cards, legends, and the Data and Analytics panes in its sidebar.
- Tableau Dashboard – is a collection of views from multiple worksheets. The Dashboard and Layout panes are available in its side bar.
- Tableau Story – contains a sequence of worksheets or dashboards that work together to convey information. The Story and Layout panes are available in its sidebar.
- Tableau Workbook (.twb) – Tableau workbook files have the .twb file extension. Workbooks hold one or more worksheets, plus zero or more dashboards and stories.
- Tableau Packaged Workbook (.twbx)– Tableau packaged workbooks have the .twbx file extension. A packaged workbook is a single zip file that contains a workbook along with any supporting local file data and background images. This format is the best way to package your work for sharing with others who don’t have access to the original data.
- Tableau Data Source (.tds) – Tableau data source files have the .tds file extension. Data source files are shortcuts for quickly connecting to the original data that you use often. Data source files do not contain the actual data but rather the information necessary to connect to the actual data as well as any modifications you’ve made on top of the actual data such as changing default properties, creating calculated fields, adding groups, and so on.
- Tableau Packaged Data Source (.tdsx) – Tableau packaged data source files have the .tdsx file extension. A packaged data source is a zip file that contains the data source file (.tds) described above as well as any local file data such as extract files (.hyper or .tde), text files, Excel files, Access files, and local cube files. Use this format to create a single file that you can then share with others who may not have access to the original data stored locally on your computer.
- Tableau Data Extract (.tde or .hyper) – Depending on the version the extract was created in, Tableau extract files can have either the .hyper or .tde file extension. Extract files are a local copy of a subset or entire data set that you can use to share data with others when you need to work offline and improve performance.
If you look at your worksheet, it should be called Sheet1, you can rename this by double-clicking or right-clicking and selecting Rename. Sheet1 is a part of Book1, you can see the Workbook name in the topmost application bar. Sheet1 should also have the World Indicators Data Source opened, and from here let us build our worksheet by going through a series of steps and checking out the functionality.
Infant Mortality Rate Over Time by Region
- Left-click and drag Year to Columns.
- Under Measures and Health, drag Infant Mortality Rate to Rows.
- Right-click on the SUM(Infant Mortality Rate) in Rows.
- Go down to Measure(SUM) and change this to Average.
- Right-click on the AVG(Infant Mortality Rate) in Rows.
- Select Format…
- Click on the Numbers drop-down box under Scale.
- Change this to 1 Decimal Percentage.
- Change the tab from Axis to Pane.
- Click on the Numbers drop-down box under Default.
- Change this to 1 Decimal Percentage.
- Click on the x on the top right of the Data Pane to close the formatting window.
- Left-click and drag Region from the Data Pane on the Colors in the Marks Pane.
- Left-click and drag Year onto the Filters Shelf.
- Select Relative Dates.
- Select Range of Dates.
- Click Ok.
- Right-click on Year in the Filters Shelf.
- Select the second Year option, not the first.
- Click Ok.
- Right click on Year in the Filters Shelf.
- Select Show Filter.
- In the Toolbar
- Click on the drop-down that says Standard and change this to Entire View.
- Click on the Presentation Mode button which is the second to last button on the right of the Toolbar.
- Interact with your newly created worksheet and click ESC to exit Presentation Mode.
It should look a little something like this:
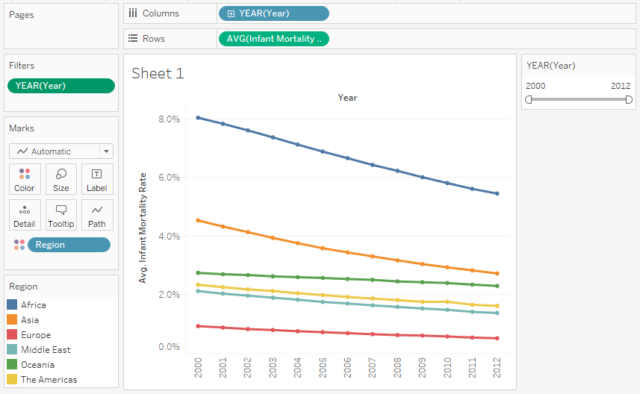
And there we have it, we have built our first worksheet, hooray…!!!
Summary
In this tutorial, we have installed Tableau Desktop and activated our 14-day trial license. We looked at the different elements of the Tableau Desktop Workspace as well as the different types of Tableau files; in later tutorials, we will dig deeper into these. Last, but not least, we built our first Tableau worksheet with data from the World Indicators Data Source.
I hope you enjoyed this tutorial, and look forward to the next one. I am always looking for ways to help share knowledge around the community, so if you want to know more about something, and wish there was an tutorial out there, do get in touch on Twitter at @Tableau_Magic.
- Introduction to Tableau (TAB101).
- Installation of Tableau Desktop (TAB102).
- Data Sources and Connectivity (TAB103).
- Building Worksheets (TAB104).
- Exploring Marks (TAB105).
- Exploring Calculated Fields (TAB106).
- Exploring Filters (TAB107)
- Exploring Parameters (TAB108).
- Exploring Sets (TAB109).
- Building Dashboards (TAB110).
- Exploring Layouts (TAB111).
- Exploring Actions (TAB112).
- Advanced Calculations:
- Table Calculations (TAB113)
- Level of Details (LOD) (TAB114)