


")


Tableau UI is a React component library containing UI components for building web applications with the Tableau look-and-feel. In this introductory tutorial, we will set up our development environment (and relevant tools), introduce React, and walk through getting a React application up and running with Tableau UI components.
Note: If you are a seasoned programmer, then the quickest way to get started is to go to the official Tableau documentation at https://tableau.github.io/tableau-ui.
Part 1: Getting Started
Let us start off by introducing and installing our development environment and tools.
Installing Microsoft Visual Studio Code
Visual Studio Code is a source code editor developed by Microsoft for Windows, Linux and macOS. It includes support for debugging, embedded Git control, syntax highlighting, intelligent code completion, snippets, and code refactoring. It is also customizable, so users can change the editor’s theme, keyboard shortcuts, and preferences. It is free and open-source, although the official download is under a proprietary license.
Visual Studio Code is based on Electron, a framework which is used to deploy Node.js applications for the desktop running on the Blink layout engine. Although it uses the Electron framework, the software does not use Atom and instead employs the same editor component (codenamed “Monaco”) used in Visual Studio Team Services (formerly called Visual Studio Online).
In the Stack Overflow 2018 Developer Survey, Visual Studio Code was ranked the most popular development environment tool, with 34.9% of 75,398 respondents claiming to use it.
I use Microsoft Visual Studio Code for most of my coding and you can download it here: https://code.visualstudio.com
Installing Node.js
We will install the Yarn Package Manager to help manage our javascript packages and dependencies, don’t worry, we will go through this a little later, but for now a little bit about Node.js and Node Package Manager (NPM).
Node.js is an open-source, cross-platform JavaScript run-time environment that executes JavaScript code outside of a browser. Historically, JavaScript was used primarily for client-side scripting, in which scripts written in JavaScript are embedded in a webpage’s HTML and run client-side by a JavaScript engine in the user’s web browser. Node.js lets developers use JavaScript to write Command Line tools and for server-side scripting—running scripts server-side to produce dynamic web page content before the page is sent to the user’s web browser. Consequently, Node.js represents a “JavaScript everywhere” paradigm, unifying web application development around a single programming language, rather than different languages for server side and client side scripts.
npm is a package manager for the JavaScript programming language. It is the default package manager for the JavaScript runtime environment Node.js. It consists of a command line client, also called npm, and an online database of public and paid-for private packages called the npm registry. The registry is accessed via the client, and the available packages can be browsed and searched via the npm website. The package manager and the registry are managed by npm, Inc.
Download and install Node.js (this includes NPM) here: https://nodejs.org.
Installing YARN
Yarn is a package manager for your code. It allows you to use and share code with other developers from around the world. Yarn does this quickly, securely, and reliably so you don’t ever have to worry.
Yarn allows you to use other developers’ solutions to different problems, making it easier for you to develop your software. If you have problems, you can report issues or contribute back, and when the problem is fixed, you can use Yarn to keep it all up to date.
Code is shared through something called a package (sometimes referred to as a module). A package contains all the code being shared as well as a package.json file which describes the package.
We will use Yarn to get a hold of various Javascript packages. Download and install Yarn here: https://yarnpkg.com/en/docs/install.
Now that we have all the required software installed, let us go about putting this all together.
- Open Visual Studio Code.
- Go to View and click on Terminal.
- This is your command terminal which will send commands to your operating system.
- Let us test to see that we have all the software installed and available on your operating system.
- Enter the following command in the Terminal and press enter:
node --version - Enter the following command in the Terminal and press enter:
yarn --version - In all cases, you should receive a single line with the version number.
- Enter the following command in the Terminal and press enter:
Now with our development environment set up, let us explore React and the Tableau-UI library.
What is React?
React (also known as React.js or ReactJS), released in May 2013, is a JavaScript library for building user interfaces. React is maintained by Facebook and a community of individual developers and companies and can be used as a base in the development of single-page or mobile applications. Complex React applications usually require the use of additional libraries for state management, routing, and interaction with an API.
Note: for a comprehensive tutorial on React, please check out the React getting started guide at https://reactjs.org/docs/getting-started.html
Tableau UI is a React user interface component library which contains the following:
- Buttons
- Checkboxes
- SelectDropdowns
- Radio Buttons
- Pills
- Text Fields
- Tabs
- Spinners
Note: this is an initial release and I am sure more components will be made available in future releases. For comprehensive documentation on what is available and usage, check out the following: https://tableau.github.io/tableau-ui/docs/index.html
I am a believer in learning by doing, so let us start developing our application.
Your Project
To start the project:
- Open Visual Studio Code.
- Open up your terminal by going to View and then clicking on Terminal.
- Make sure your terminal is pointing to your project directory (see terminal commands).
- In your terminal enter the following command:
npm i -g create-react-appwhich installs create-react-app that will enable you to create React applications with no configuration.create-react-app my-tableau-ui-applicationwhich will create your React application with all dependencies and save you time.cd my-tableau-ui-applicationto navigate to your directory.npm startto start your React application, your default web browser should open with the following URLhttp://localhost:3000
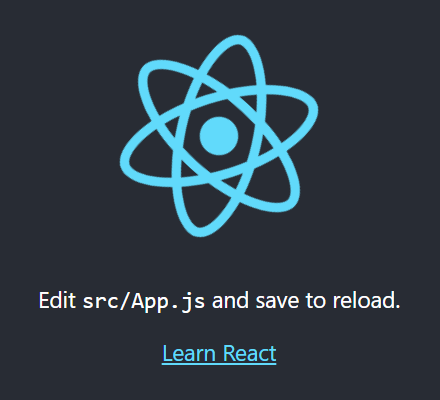
If all is done well you should see the following:
Now we will remove some of the boilerplate code and add the code for our Tableau UI React components.
- Open the my-tableau-ui-application folder in Visual Studio Code.
- Delete all files in the src folder, we want to clear this out and start from scratch.
- In your Terminal enter:
yarn add @tableau/tableau-uiwhich will install the Tableau UI React component library.
Now we will create the src/index.js with the following content.
import React from 'react';
import ReactDOM from 'react-dom';
import { Pill } from '@tableau/tableau-ui';

const pills = <div style={{ width: 150 }}>
   <Pill kind='discrete'>Discrete</Pill><br/>
   <Pill kind='continuous'>Continuous</Pill><br/>
   <Pill kind='other'>Other</Pill><br/>
   <Pill kind='invalid'>Invalid</Pill>
</div>

ReactDOM.render(pills, document.getElementById('root'));
There is a lot of information on both the React website and Tableau UI website about what is going on, but to summarise:
- The first two lines import the React and ReactDom libraries into our project.
- The third line imports Pill from the Tableau UI component library.
- We create a const called pills with a JSX expression that creates a div with four Pills elements.
- Lastly, we render the JSX expression to the root within the index.html file.
JSX – This funny tag syntax is neither a string nor HTML. It is called JSX, and it is a syntax extension to JavaScript. We recommend using it with React to describe what the UI should look like. JSX may remind you of a template language, but it comes with the full power of JavaScript. JSX produces React ‘elements’.
If all goes well, reload your page and you should see the following:
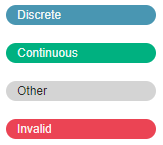
and boom, you are done, does this remind you of anything. You can find a full list of JSX expressions and Tableau UI components at https://tableau.github.io/tableau-ui/docs/index.html, do have a go yourself to see what you can create and do not forget to import the components you are using.
Summary
In this lengthy tutorial, we have covered a large amount of ground. We looked at:
- Setting up the development environment.
- Downloaded various web libraries.
- Bootstrap for the look and feel of the component.
- jQuery to manipulate and add remove the worksheets.
- React JavaScript library.
- Tableau UI React component library.
- We installed and used npm and create-react-app to set up our Tableau UI web application.
- Finally, we added a Tableau UI component to our React application.
I hope you all enjoyed this article as much as I enjoyed writing it. Do let me know if you experienced any issues getting up and running, and as always, please leave a comment below or reach out to me on Twitter @Tableau_Magic.
Read more about Tableau UI on the official website: https://tableau.github.io/tableau-ui
If you like our work, do consider supporting us on Patreon, and for supporting us, we will give you early access to tutorials, exclusive videos, as well as access to current and future courses on Udemy:
- Patreon: https://www.patreon.com/tableaumagic
Also, do be sure to check out our various courses:
- Creating Bespoke Data Visualizations (Udemy)
- Introduction to Tableau (Online Instructor-Led)
- Advanced Calculations (Online Instructor-Led)
- Creating Bespoke Data Visualizations (Online Instructor-Led)


")


Thanks for writing this, Toan. We appreciate your enthusiasm and your efforts to make Tableau UI more friendly to the Tableau community 🙂
is there an example demo anywhere I can see this in?
To be honest, I have not seen many demonstrations of this. If you join the DataDev Slack channel, someone might be able to point you to some of their work.